WooCommerce shipping plugins often don’t change the order status to “completed” after delivery. This means a staff member has to manually check the shipment and update the status of each order, which is a repetitive and annoying task. In this guide, we’ll discuss how can we automate this step so you don’t have to do this ever again.
We’ll be working with the WooCommerce Shipmate integration, but the same principles apply to other services that have shipment event-based webhooks.
Understanding Webhooks
Webhooks are like automatic messages that apps send to each other when certain events occur. They carry a message, called a payload, and are delivered to a specific web address known as a URL. You can think of them as digital telegrams that one app sends to another to inform it about something important.
For example, let’s say you make a purchase on a WooCommerce-powered online store using Stripe as the payment processor. When you complete the order, Stripe doesn’t just sit idle; it reaches out to your bank to verify if you have enough funds. Once confirmed, Stripe sends a message back to the WooCommerce store to confirm that your payment was successful. This communication happens seamlessly through a webhook URL, which is typically set up automatically when you install the Stripe plugin for WooCommerce.
For a deeper dive into webhooks, refer to this article.
1. Setting Up the Webhook URL
- Install the WP Webhooks plugin.
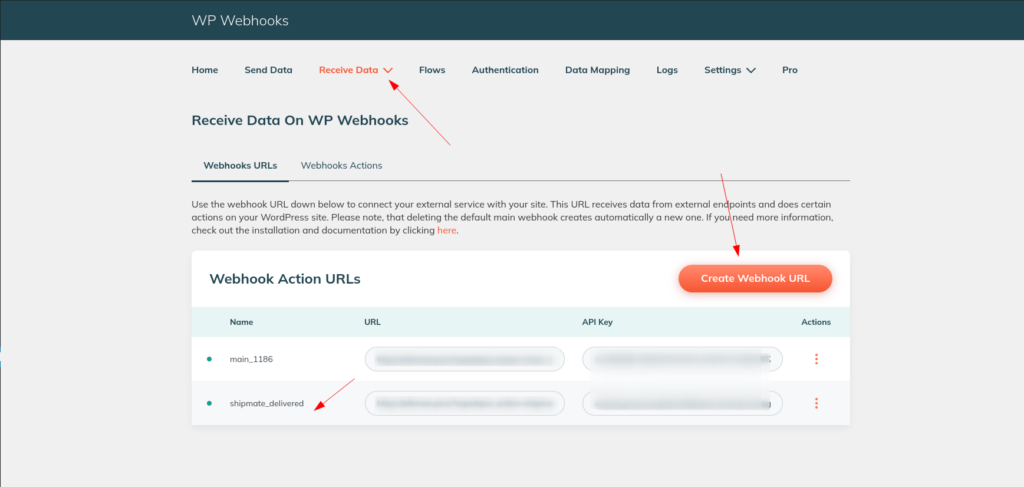
- Navigate to Settings ➜ Receive Data and create a webhook URL. For example, name it
shipmate_delivered. - To link the webhook URL to a custom function, we need to add the following query arguments to the URL:
actionandwpwh_identifier. These arguments will help us connect the payload to the custom function we’ll write later. The value ofactionwill becustom_actionas for the identifier, it can be anything you like.

The webhook URL should resemble this format:
https://example.com/?wpwhpro_action=shipmate_delivered&wpwhpro_api_key=aiqeilagwfynyvoj3ahnxiflbxduxr10ot4yxiz3ajgrljejmlvevklocyjyqhdu&action=custom_action&wpwh_identifier=shipmate_delivered Note: You don’t have to pass the
actionandwpwh_identifieras query arguments like I’m doing above, you can also add them to the body of the request if the service you’re using allows it.
2. Setting up the Delivery Event.
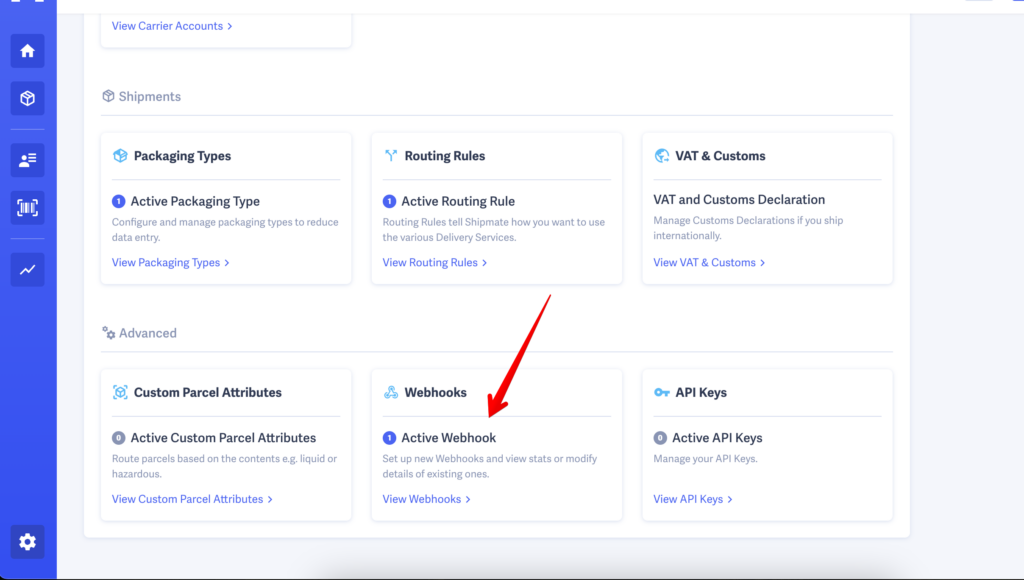
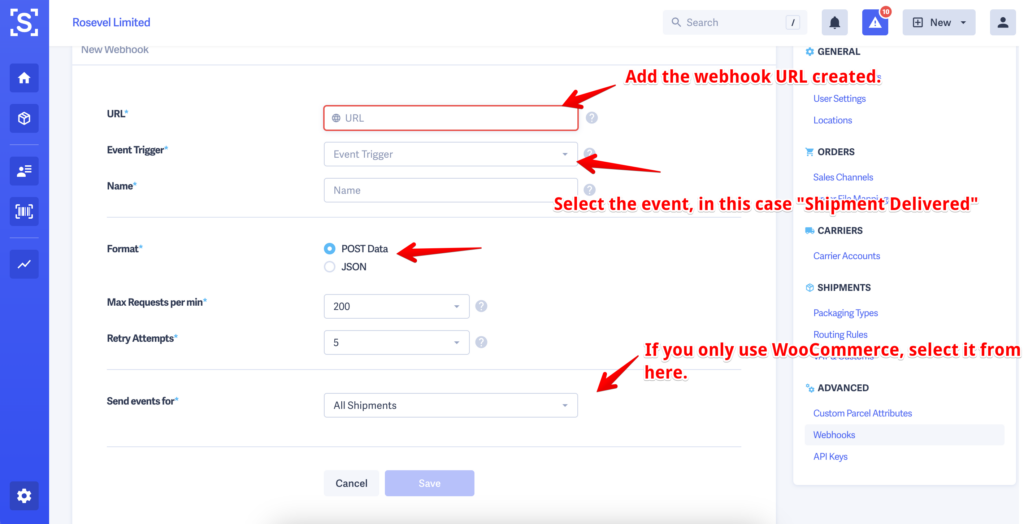
This step won’t be the same for every shipping service, so please follow the documentation for assistance. In the case of Shipmate, you can simply click on the profile icon ➜ Settings, then scroll down until you find webhooks.


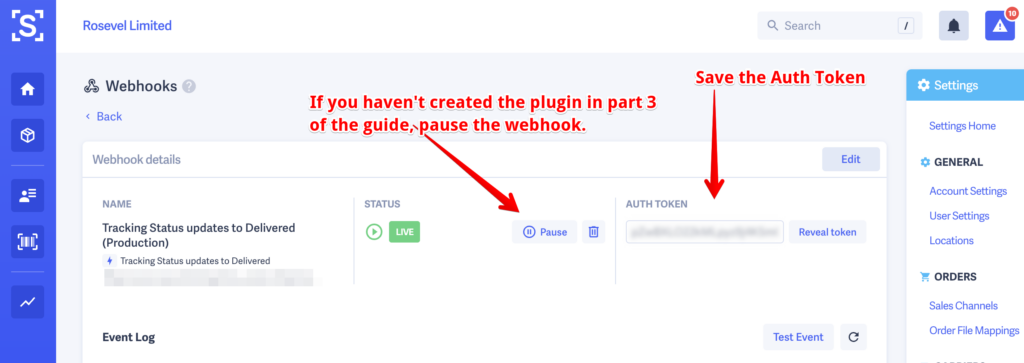
Once you create the webhook, pause it temporarily until you finish part 3. We don’t want to send a payload to our server without the logic to process the data being ready, which will be part 3 below.

3. Creating a Custom Plugin to Change the Order Status.
With Shipmate, the order ID will be available in the webhook payload as shipment_reference, so we’ll pick that from the data load to gain access to the $order object, which we can then use to update the order status or do whatever we want.
But before that, let’s discuss security. You wouldn’t want anyone to be able to change order statuses by guessing the webhook URL and send POST requests in bulk. Shipmate has a solution for this; instead of relying on something like Basic Auth, they include an Auth token with each request, which you should keep secret. If the incoming auth_token isn’t equal to the Auth token set in your code to process the data ➜ you can stop the execution and throw an error.
If you want to go the extra mile (which you probably should for peace of mind), you can limit the incoming requests to certain IP addresses, however, this feature is behind a paywall. You can check this page to learn more about it.
I’ve written a ready-to-use template which you can use below if you’re using Shipmate, you only need to update the $set_secret_value to your own auth token and compress the file (.zip) so you can upload it to WordPress as a plugin.
Make sure to Resume the webhook from your Shipmate dashboard after you activate the plugin.
If you already use the “Complete” status for something else, you can check this guide on how to create a custom order status like “Delivered”.
And that’s it, whenever an order is delivered to one of your customers, the order status will be switched to complete. : )
Need help building a custom WooCommerce/WordPress solution? Feel free to submit the contact form here for a quote.
Leave a Reply